Whether your dock is a total wreck or it’s just not your style, there are several resources to help you replace it, from parts, to complete building plans, to folks who will help you design and build your own and even construct it on-site.
Docks range from very simple structures that may cost a couple thousand bucks to extremely complex systems that cost several thousand. How you decide to upgrade depends on how handy you are, what type of shoreline and lake bottom you’re faced with, and your budget.
Be honest about your handyman status
When you’re choosing what route to take in planning a new dock, it’s best to take stock of your situation and your skills. If you have Bob Vila-worthy skills, plenty of time, and an amenable shoreline and water depth, a “kit” dock is a great budget-friendly option. These do-it-yourself kits, which simply assemble at the shoreline and almost drop into place, are becoming more popular.
But if you can’t get up to camp for more than a day or two at a time, and/or you’re not one to tackle a major job, consider hiring a professional to design and build your dock.
The up-front costs will be much higher than buying materials and building it yourself, but think of the benefits: Your dock will be built right and last for many years, and those weekends you’d have to spend measuring, hammering and drilling can be spent on other things.
See also Choosing the Best Dock For the Cabin

Consider lake beds and depths
You may have the background and fortitude to build your own dock, but other limitations might put the brakes on your homebuilt project. Typically, the configuration of the lake’s bottom combined with your shoreline layout will dictate whether you’ll need help with the design, layout and installation of your dock.
The general rule for lake bottoms: If it’s sandy and flat, you’ll have little trouble. If the depth varies by only a couple of feet from the shoreline to where the end of the dock will be, that’s OK too – most kit docks will have enough built-in adjustability to accommodate this.
But if your lake bottom is rocky and varies more than a couple feet in depth from the shoreline out to where the end of the dock will be, you’ll likely need some expert help.
Measuring the correct depth with accuracy will be the toughest task. Keep in mind that many lakes are drawn down and refilled from time to time, depending on the season and local water needs. If your lake varies dramatically in depth over time, your dock project may take on a whole new dimension; you’ll need a dock that you can continually adjust for the varying depths.
In these cases, a floating dock may be your only option, or you may need a dock that you actually move in (up the shoreline) and out, according to the lake depth.
If you don’t know what’s typical at your lake, talk to your cabin neighbors who have docks. Check out how their docks operate when the lake depth changes. Talk to local dock builders as well, because they will be the most experienced at building docks that can be moved readily.
Basic dock types
The next thing you’ll want to consider is what type of dock is best for your situation:
-
A floating dock is anchored to your shoreline and the lake bottom and supported by pontoons or flotation units. It may be the most versatile type of dock, because it’s easy to buy, install and configure, and it will rise and fall with the lake level. If your lake will freeze in winter, a floating dock is typically easy to remove and store, which avoids potential ice damage. The drawback to a floating dock is its relative lack of stability. Many people can be intimidated by walking on floating docks, because they move with every wave and footstep. They’re not tippy, but the feeling of stability that a post or crib dock offers is just not there.
-
Post docks use stanchions, or leg-support assemblies, placed about every 10 feet along the dock to support it. The “feet” of the leg supports actually sit directly on the lake bottom, making the dock semi-permanent. Post docks are very popular, and they offer stability and a sense of permanence that floating docks just don’t have. They can be surprisingly easy to install and remove, especially units made from aluminum or a combination of aluminum and plastic or wood decking material. Many can be removed and installed (after the initial setup, of course) in a matter of hours, making them ideal for freezing climates where ice damage to the dock’s legs is a possibility. Rolling docks that have wheels can make this even easier.
-
Crib docks are typically designed and installed by professionals, and they are the most permanent and expensive type of docks. The “crib” part refers to the support structures that hold the dock to the lake bottom. Each “crib” looks like a crate. The cribs are typically built from large treated timbers, then placed every 10 feet or so on the lake bottom and filled with large rocks. The cribs provide a permanent anchor for the dock’s upper structure and walkways. For a complex dock with multiple piers, levels and even overhead structures (like a boathouse or a deck), a crib dock usually offers the best strength and integrity. Crib docks are generally not available in kit form; they are custom-built structures designed and built on site (if state and local regulations allow), and they’re definitely not designed to be moved or removed from the water.

DIY-friendly dock types
Since crib docks are best left to local experts, consider a floating or post dock if you want to plan and build a dock yourself. To see a small sampling of the literally dozens of suppliers for dock parts, kits, plans, accessories and complete assemblies, check out DIY Kit Dock Suppliers.
The great news is that no matter where your cabin is located, there’s likely a dock supplier/manufacturer in your region that will provide you with whatever you need.
See also Best Dock Layouts
Materials and construction
Docks built by DIYers based on plans they’ve purchased or drawn themselves, or even docks designed by a local builder, are usually constructed the old-fashioned way: from treated wood with galvanized screws, bolts and nuts.
Aluminum (for legs and framework) and synthetics, such as plastic (for decking material), are the standards in kit docks offered by most suppliers today. The advantages of using aluminum and composites over wood in combined weight savings, durability, strength and weather resistance are undeniable.
While the aluminum-and-plastic kit models are easier to install and remove, wood is more aesthetically pleasing and blends in with the surroundings. But if you can’t always count on your kids or buddies to help when it’s dock-maintenance time, go with aluminum and plastic – your back will thank you. Installing and removing a wood dock is nearly impossible without help or a wheel system to carry the loads.
If you do go with a wood dock, be sure to check local regulations regarding chemical treatment and lake concerns; some local ordinances prohibit the use of chemically treated wood due to the fear that it will contaminate lake water.
Hardware should always be galvanized for corrosion resistance; if you can afford it, go with stainless steel. If you’re building with wood, never use nails; coated or galvanized decking screws are best.

Design and layout
Your shoreline and lake-bottom configuration, as well as local ordinances and regulations, will all have bearing on the type, size, shape and location of your dock. Whether you’re repairing an existing dock or replacing it, and especially if you’re planning an expansion or complete replacement, it’s best to check with local authorities on existing regulations. You may find yourself in violation and subject to fines, or worse: having to tear down what you’ve built.
Generally, you’ll need at least a few feet of water depth to dock a boat any bigger than a PWC or fishing skiff. That may mean extending your dock out more than you originally thought. For example, my dock is 70 feet from shoreline to end, but only the outermost 45 feet or so is usable; the first two and a half sections (each is 10 feet long) only serve to get out past the shallow areas near shore.
A typical stern-drive boat needs a few feet of depth at the stern so the outdrive won’t ground on the lake bottom. A lighter outboard rig can usually get by with less depth, but 2 feet should be considered the minimum.
If your shoreline is very shallow and extending the dock out is too costly or not allowed by local regulations, you may have to consider dredging (removing sediment from the lake bottom to increase depth). While the technique is simple – a backhoe operator spends a few days digging out the area – the process is not; it can be very complex when it involves regulations and environmental concerns. Again, a thorough check with local and state authorities is in order before any operations begin.
Careful planning will result in less crowding when everyone’s on the dock and you’re juggling the various boats and toys to get the full use of your dock. Factor in how many boats will use the dock at one time, including any guests who may want to tie up when it’s time for a cookout.
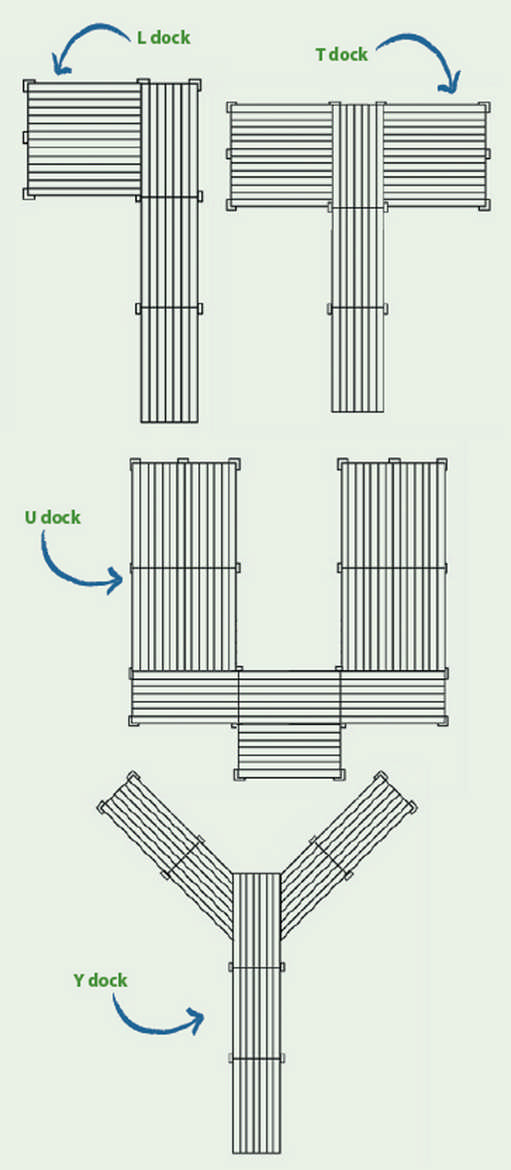
It also pays to watch the typical wind direction and wave action on the lake; if the winds blow at your shoreline and waves from passing boats are large and menacing, consider adding “fingers” (L- or T-shaped extensions) to the main section of your dock. These can provide protection from buffeting winds and passing boat wakes; you can dock your boat on the inside of these extensions, so it’s pushed away from the dock by the wind and waves. The extensions also add stability to a long dock by creating a larger “footprint” at the end. They also add cost and complexity, so remember that when it’s budget time.

Winter worries
If your lake will freeze, a winter plan for your new dock is a must. Many kit docks are designed to be removed in fall and reinstalled in spring – some even by one person. While removal is the safest choice, leaving the dock in and “bubbling” it is another.
Permanent docks are typically bubbled using one of several methods. Most common is an “ice eater,” a large electric motor with propeller designed to be positioned strategically off the dock in the water during the winter months, operated via thermostat and timer switches.
The propeller draws warmer water up from the lake bottom and pushes it back toward the dock; the resulting turbulence keeps the lake from freezing and damaging the dock.
Of course, there are potential issues; the unit could fail, allowing the water to freeze and move the dock as the ice heaves and settles. If you can’t get up to your camp periodically to check things over, or you can’t ask someone local to do it, removal is the safest bet.
See also Should You Remove Your Dock Before Winter?
Ready for summer
No matter your decision, a well-planned dock can provide decades of enjoyment. Our supplier list will give you a head start, but an online search for “boat docks” will give you great resources, too. Try to select suppliers located a reasonable distance from your camp; docks are heavy, so freight charges are a huge factor in overall cost.
John Tiger writes from his cabin in upstate New York. His 30+ years of dock experience began with installing and removing his dad’s docks, which mysteriously got heavier each passing year.


