Easy Installation
Really, electrical work doesn’t get much simpler than this. The transformer connects to a 110-volt outside receptacle (which must be a ground-fault circuit interrupted, or GFCI, outlet) and converts it to low voltage, typically 12 volts. You’ll run special low-voltage wire from the transformer to the lights, similar to a typical electrical run inside your cabin – just at much safer voltage levels.
The other key electrical part of this equation is the wattage. Higher wattage transformers allow you to run more lights, and they also require heavier gauge wire. It’s a good idea to oversize your cable and transformer, so simply add up the wattage for each of your lighting runs (i.e., three 50-watt lights on a run = 150 watts) and add 20 to 25 percent to the total when sizing both your transformer and your wire. This will ensure that you can add additional lights in the future without having to replace an undersized line or buy a new transformer.
Loosely anchor your fixtures in the desired locations, and then run cable from the transformer to the closest fixture. Connect the rest of the fixtures together, using weatherproof wire connectors instead of the press-on type connectors that come with many DIY kits. Make sure that you match the ridged cable to ridged cable, and smooth cable to smooth cable at each fixture. In order to prevent voltage drop, split your lights into separate runs whenever possible by adding a new main line.
Now go plug the transformer in. It should come equipped with a standard or light-activated timer, which will need to be bypassed for a daytime check. If the lights don’t work on your test run, check the connections and GFCI outlet – it may have tripped at some point. Simply push in the small rectangular button between the two receptacles on the GFCI outlet until it clicks.
Assuming all the lights are on, go ahead and bury the cable 3 inches underground and anchor your fixtures. (Just be sure to check with your local utility before digging in.) This saves significant time and labor compared to installing high-voltage lights, which normally require 3-foot deep trenching.
5 Helpful Hints
It’s really that easy. But before you head to the hardware store, take a minute to read through some of the tips below first.
1 The best design tool: How do you put your cabin in the most flattering light? Here’s a hint: it’s not a fancy software program, or even an expert contractor versed in the field of low-voltage lighting. Simply grab a flashlight and march around the cabin yard at night. Shine the flashlight on various structures (from a ground angle in most cases, though tree-mounts can give a great twist to backyard lighting schemes). Have an assistant trade spots with you as you decide what features of your cabin and yard look good with a little more light … and what things are better left to the cover of darkness.
2 Plan for the furture: Leave a little extra cable at each fixture. As your yard’s features or your preferences change, you’ll always be able to
readjust the light’s location.
3 Highlight your nightlife: Shrubs, flowers and ornamental trees spruce up any yard in the daytime, and the same holds true for when the sun slips below the horizon. And don’t forget what the shadow knows: Silhouettes of leaves and blades of grass against the cabin add a great after-dinner atmosphere.
4 Don't get burnt out: The two most common causes of premature bulb failure are inferior bulbs and too much voltage. Buying high-quality halogen bulbs will increase bulb life, and allowing at least 10 feet of cable between the transformer and the nearest outlet will allow the voltage to drop to acceptable levels. Want to locate a fixture less than 10 feet from the transformer? Just coil some extra cable and bury it at the base of the fixture.
5 The aquarium effect: Looking for a really neat way to spruce up your lakeshore area? Use a submersible low-voltage light set in shallow, clear water and you’ll have the coolest dock around. There is one caveat: Many states have angling laws that prohibit attracting fish with underwater lights, so stow the rod and just enjoy the light show.
You’ll soon find out that the special effect of a low-voltage system will transform your ho-hum cabin lawn into a spectacular backyard retreat. For safe, economical, and beautiful outside lighting, the only way to beat low-voltage lighting is to … well, I guess you’d have to shoot for the moon.
Kurt Anderson is a freelance writer and dedicated shack-rat who, when it comes to outdoor lighting, has finally seen the (low-voltage) light.
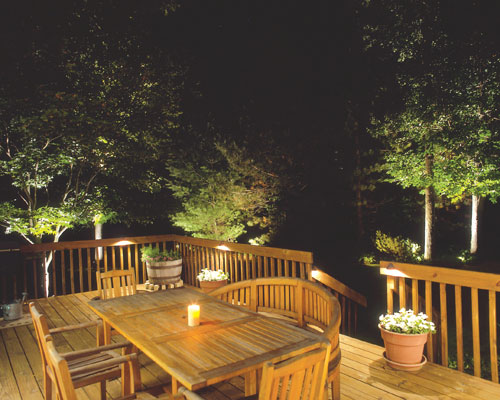
So here’s the dilemma: When the sun goes down, your day at the cabin is far from over. Whether it’s entertaining guests or having a peaceful evening on the deck with family, you want to be able to see your companions without shining a flashlight in their faces.
But when you install lighted pathways to the lake or the guest cabin, you want to provide enough light to safely get where you’re going, without creating a landing strip out of your cabin yard. The best in outdoor lighting is easy on the eyes while complementing your cabin and yard, accentuating their best features.
You can go with the old tried-and-true, of course, but floodlights add a bit too much illumination and ruin the starry night skies. Solar lights? Nice in certain situations, but their low-maintenance, free energy comes at a cost: seriously wimpy candlepower.
Enter the happy medium: low-voltage outdoor lighting. It's safe, economical and – here’s the part that always makes me happy – basically dummy-proof to install. Low-voltage lighting can be installed throughout your cabin’s property in a weekend or less, often for under $500. All you need to get started are the transformer, the cable, fixtures and a little bit of know-how.