Outdoor showers are a great way to get clean outdoors, a smart way to provide an auxiliary shower for guests during a crowded weekend and a convenient place to clean up sandy feet or after messy yard work. But the question is: What type of outdoor shower? A fully plumbed shower can be complicated. A solar powered shower, on the other hand, is appealing in its simplicity.
But suspended-tank-style solar showers are often burdened with operational and aesthetic issues. Because these traditional solar showers rely on head pressure from a suspended hot water tank, low flows can be a source of frustration when the water level drops. The tanks can also be repositories for bacteria and algae, requiring constant treatment. And let’s face it – the old “barrel over an outhouse” design can be a bit of a put-off when it’s sitting next to your beautiful cabin.
But you can still enjoy a warm – and fashionably green – shower under a blue sky by making a few tweaks to the traditional design. In this shower plan, the tank is replaced with a homemade solar coil connected to a garden hose, with both cold and hot supply lines. The end result is an open-topped, efficient solar shower with plenty of pressure and a quick recharge time, perfect for a quick rinse after yard work or before going for a dip in the hot tub or a steam in the sauna.

Choosing the Right Spot
Other than proximity to the sauna/hot tub, there are a few other factors to contemplate when you choose a location for your shower. Sunlight exposure is obviously a prerequisite, but if a straight southern exposure isn’t possible, a southwesterly or southeasterly exposure will usually provide ample solar energy.
Next, you’ll want to be within about 90 feet of an outdoor spigot, as the water supply for the shower will be provided via a garden hose. Since most garden hoses come in 100-foot lengths, staying within 90 feet will allow you a little slack when making connections. Try to choose a location where the hose can be run a few feet back from the edge of the lawn to avoid nicking it with the lawnmower or weed trimmer.
If possible, follow the example military commanders have set for millennia: choose high ground. Not only will it help avoid having to traverse a muddy trail with clean feet, the drainage will help irrigate dry soils. (Some eco-friendly folks even use the drainage to irrigate flower gardens.)
Last but not least, if you're not sure about local permitting and setback requirements, check with your municipal, county or state permitting agency.
Prepare Your Foundation
The easiest foundation is the kind that already exists, i.e., a cement slab, seldom-used edge of a patio, or even a deck. Lacking that, you can easily create a stable and well-drained base with a shovel and some fill. The crushed rock shown in the diagram is not always necessary, especially in drier climates; in fact, you may want to take advantage of the moisture for irrigation. However, in areas where heavy rains or clay soils create muddy conditions, this design will allow you to walk away from your shower with clean toes.
Excavate the base slightly larger than the shower. For a standard 4x4-foot shower, a 6-foot-square excavation 8 to 12 inches below grade will easily collect drainage from several showers; feel free to expand your shower as you see fit.
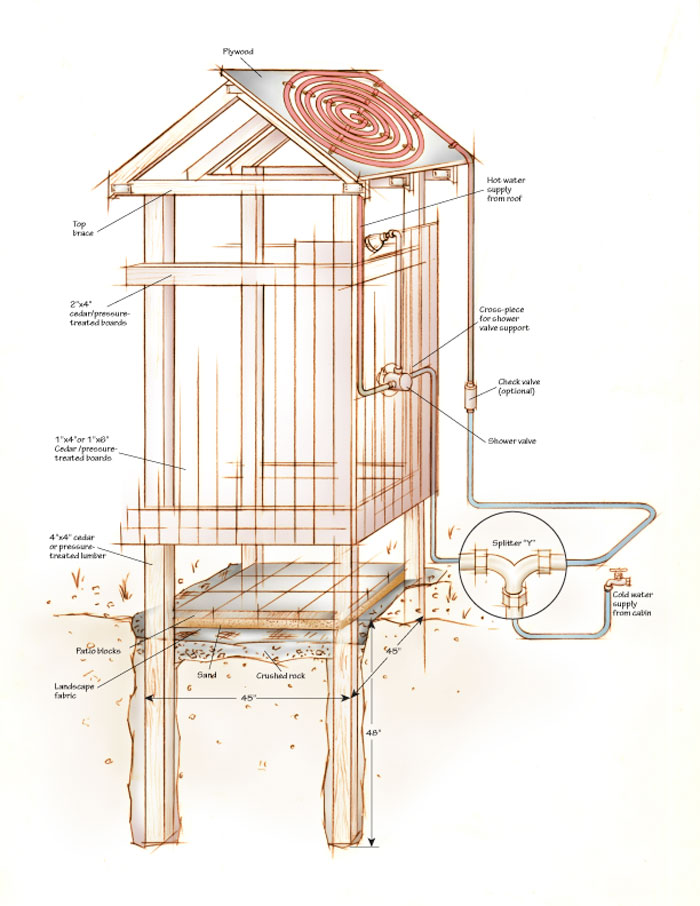
Next, use a pair of post-hole diggers to dig the corner posts holes so the outside corners are 45 inches apart. The holes should extend approximately 48 inches down from grade – you can get away with 36-inch-deep corner holes if you don’t have to worry about frost.
Set the posts (12-foot pressure-treated or cedar 4x4s) and backfill with native soil, taking extra time to tamp the backfill in firmly around the posts. Backfill the entire excavated area with crushed rock to grade, mounding up the edges as shown. Now place a layer of landscape fabric down, add a couple inches of clean sand on top of that, and add patio blocks or bricks for the floor. Water from the shower will drain through the gaps in the patio blocks and into the crushed rock.
The easiest foundation is the kind that already exists, i.e., a cement slab, seldom-used edge of a patio, or even a deck. Lacking that, you can easily create a stable and well-drained base with a shovel and some fill. The crushed rock shown in the diagram is not always necessary, especially in drier climates; in fact, you may want to take advantage of the moisture for irrigation. However, in areas where heavy rains or clay soils create muddy conditions, this design will allow you to walk away from your shower with clean toes.
Excavate the base slightly larger than the shower. For a standard 4x4-foot shower, a 6-foot-square excavation 8 to 12 inches below grade will easily collect drainage from several showers; feel free to expand your shower as you see fit.
Next, use a pair of post-hole diggers to dig the corner posts holes so the outside corners are 45 inches apart. The holes should extend approximately 48 inches down from grade – you can get away with 36-inch-deep corner holes if you don’t have to worry about frost.
Set the posts (12-foot pressure-treated or cedar 4x4s) and backfill with native soil, taking extra time to tamp the backfill in firmly around the posts. Backfill the entire excavated area with crushed rock to grade, mounding up the edges as shown. Now place a layer of landscape fabric down, add a couple inches of clean sand on top of that, and add patio blocks or bricks for the floor. Water from the shower will drain through the gaps in the patio blocks and into the crushed rock.
Build the Walls & Rafters
You now have four poles spaced 45 inches apart, roughly 8 inches above grade.
Walls & Door: You can use pre-built privacy panels to form the walls, or build your own. If you make your own, simply add 2x4-inch cross-bracing at approximately 24 inches and 72 inches above grade, and use 1x4-inch or 1x6-inch boards lengthwise to form the walls (if you want to get a little fancier, you could install frosted glass panels instead). The entire wall on the north end should be hinged to form the door. Treated lumber, cedar or other naturally rot-resistant woods should be used for the walls and any cross-bracing.
Rafters: Add a brace to connect the corner posts; this top brace will also serve as a base for the rafters. You can easily make the rafters by following the template [above], again using a wood species that will withstand the elements. Orient the rafters so they are angled to the north and south.
Roof: The south-facing rafter can now be sheeted; the typical material is exterior-grade plywood painted a flat black. Feel free to experiment with cedar tongue-and-groove boards or other suitable roof sheeting on this “solar roof,” again painting the exterior flat black for optimal solar performance and weather protection.
 Plumbing
 Warm water is provided by looping a series of coils on the south-facing, black-painted southern roof panel.
These coils are sometimes made from 1-inch black plastic HDPE water supply pipe. However, an easier solution is to use a dark-colored garden hose. A 100-foot length of hose will provide several gallons of very warm water on a typical sunny day. In fact, the water will often be too hot on a summer afternoon to use without blending in some cold water – a problem that this design solves. Be sure to purchase a “drinking water” grade of garden hose (e.g., Colorite or Apex brands) to prevent the leaching of lead into your hot water, a problem that can be exacerbated by prolonged exposure to warm temperatures with regular garden hoses.
Fasten the loops of tubing/hose to the solar roof using plastic piping clips, leaving sufficient lengths on each end to attach to the supply lines. Attach one end to the splitter Y on the garden hose attachment (the cold water supply goes to the other side of the splitter). The other end is fastened to the hot water side of a standard showerhead, which is mounted inside. If there is heavy demand for the shower, install a low-flow showerhead to limit water usage.
And that’s it! You now have a pressurized solar shower that allows you to adjust the temp of the water via standard hot-and-cold handles.
Be sure to shut off the water supply between visits to the cabin, flush the lines occasionally, and drain the lines prior to winter if your cabin is in a frigid clime. Other than those simple precautions, you now have a maintenance-free shower that relies only on the vagaries of the sun for optimal enjoyment – a common enough requirement for any activity at the cabin.
THE PLUMBED OUTDOOR SHOWER
With outdoor showers, there’s a wide range of possibilities. A low-tech solar unit, like the one in the main article, scores high on simplicity but lower on comfort and elegance. At the other end of the spectrum is an outdoor shower like the one pictured at right – more complex, but offering all the comforts of an indoor shower. This outdoor shower is built into the exterior of the cabin and takes full advantage of existing plumbing and electrical utilities (for the overhead light), resulting in an elegant and highly functional shower that blends perfectly with the cabin’s exterior.
But creating an outdoor shower that is connected to the cabin can have serious ramifications if done incorrectly. So keep these pointers in mind:
Plumbing: All plumbers north of the Mason-Dixon Line know that running a water supply line in an exterior wall can bring a wintertime disaster, yet the water supply must be piped to the shower valve on the outside wall for this style of outdoor shower to function. So, it is critical to incorporate a bleeder valve to remove the water from the pipe prior to the onset of freezing weather. It is not enough to simply shut off the water source to the shower when the mercury plummets, as water will remain trapped in the pipes – the same effect as holding your thumb over the end of a straw. Whether you plumb it yourself or hire out the job, ensure that the final design includes an easily accessible “air vent,” a tee/valve combination that allows the pipe water to fully drain from the supply lines.
Tile & Grout: The impacts of even mild temperature swings can also affect the tiled walls and grout of an outdoor shower. A low-absorption rated tile is essential in freeze thaw conditions; look for Class V tile, designed for outdoor use. The regular mortar-based grout used in interior showers will tend to expand and contract much more in an outdoor setting, causing the grout to fracture and subsequently allowing moisture access to the cabin’s wall. Use an outdoor-rated silicone sealant instead, which allows the grouting to flex as the temperatures fluctuate.
Electricity: Finally, on a safety note, make sure to eliminate exposure to any outdoor electrical sources, such as extension cords, and replace any standard outlets outside the cabin with ground-fault circuit interrupted (GCFI) outlets to reduce the risk of stray voltage reaching the shower area.
Drainage: Be sure to grade the shower base so that it drains away from your cabin, using standard landscaping practices. A typical outdoor shower creates the same amount of runoff as a short-lived rain event.