Mission:
Transform an uninspired, traditional-looking fireplace into the focal point of the living room.
Solution:
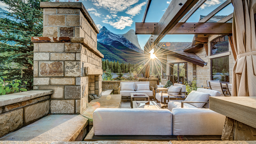
Using manufactured stone, create a rustic, rock fireplace tapering from the mantel toward the ceiling.
Transform an uninspired, traditional-looking fireplace into the focal point of the living room.
Solution:
Using manufactured stone, create a rustic, rock fireplace tapering from the mantel toward the ceiling.
How it was done:
Professional installers replaced the fireplace insert, then built a metal and wood framework for the new surround. They covered the framework with tar paper, then overlaid that with a screen mesh to hold the mortar mix and stones.
Then came the fun part: Putting on the stones. The Cabin Life team chose manufactured stone for the new surround because the fireplace didn’t have footings that would support authentic, heavy stones.
Although manufactured stones can be less than 2 inches thick, the stones look real once installed, especially when the grout is recessed.
These stones are from St. Croix Stone, which casts their concrete stones from thousands of individual molds, so you won’t have to use the same stone twice in a project of this size. Each stone is the same color throughout so it holds its appearance even if chipped or cracked.
Laying stone. We first laid a skim coat of concrete mortar over the mesh screen, then let the skim coat dry overnight.
Next we applied the stones, one at a time, by spreading a layer of mortar on the back of each stone, then pressing the stone in place with a slight wiggling motion. Again, the stones were left to dry overnight.
As a finishing touch, we used edge stones to line the firebox opening to give a natural, smooth stone look.
The last of the mortar work involved squeezing mortar from a grout bag into the spaces between the stones, tapping the mortar into the joints, smoothing it out, then brushing it with a concrete brush to achieve a uniform appearance. At this point, we left our handiwork several days to completely set and dry.
Finally, we applied a coat of glossy glaze to give the stones a wet look.
And the next thing you know, we were painting the wall to complement the colors of the new fireplace. It’s the way all home improvement projects seem to go.